Flat lay photography has become one of the most popular and recognizable styles in product photography, social media marketing, and ecommerce. Scroll through any fashion brand's Instagram feed and you will find beautifully arranged clothing items, accessories, and lifestyle props captured from directly overhead. This bird's-eye perspective turns ordinary products into visually compelling compositions that tell a story, showcase details, and drive engagement.
For clothing brands, flat lay photography is especially powerful. It allows you to display garments in a way that highlights fabric textures, patterns, color variations, and styling possibilities without the expense of a full model shoot. Whether you are launching a new collection on Shopify, building your Instagram presence, or creating product listings for Amazon, mastering flat lay photography can dramatically improve the quality and consistency of your visual content.
In this comprehensive guide, we will walk you through everything you need to know about how to do flat lay photography for clothing. From equipment and composition techniques to lighting, camera settings, and post-processing, you will have all the knowledge you need to create professional-quality flat lay images that convert browsers into buyers.
What Is Flat Lay Photography?
Flat lay photography is a style of photography where items are arranged on a flat surface and photographed from directly overhead at a 90-degree angle. The camera looks straight down at the scene, creating a two-dimensional, map-like view of the objects below. This perspective eliminates depth distortion and gives every item in the frame equal visual weight, making it ideal for showcasing multiple products or creating carefully curated compositions.
The flat lay technique has roots in editorial and food photography, but it exploded in popularity with the rise of Instagram and Pinterest. Today, it is one of the most widely used formats for product photography across virtually every retail category. But why do brands love it so much?
- Instagram-friendly format: Flat lays are inherently square-friendly and look stunning in grid layouts. They are among the most shared and saved content types on visual platforms, making them a social media marketing powerhouse.
- Shows product details: The overhead angle lets you display intricate details such as stitching, buttons, labels, fabric weave, and print patterns that might be missed in standard product shots. Customers can see exactly what they are purchasing.
- Incredibly versatile: You can style a flat lay to feel minimal and clean for an ecommerce listing, or warm and lifestyle-oriented for social media content. The same technique adapts to countless moods and brand aesthetics.
- Cost-effective production: Compared to hiring models and booking studio time, flat lay photography requires minimal equipment and can be done in a small space, even on your living room floor or a kitchen table.
Flat lay photography works best for casual wear, knitwear, accessories, jewelry, beauty products, and lifestyle brands. Clothing items that fold or drape well, such as t-shirts, denim, sweaters, scarves, and activewear, are particularly well-suited to this format. Structured garments like blazers or tailored dresses may require ghost mannequin photography for the best results, though flat lays can still work as supplementary lifestyle images.
Equipment for Flat Lay Photography
One of the great advantages of flat lay photography is that you do not need an expensive studio to get started. With the right basic equipment and a little creativity, you can produce professional-looking results on almost any budget. Here is what you need to set up your flat lay photography station.
Camera or Smartphone
Any modern camera with manual controls will work well for flat lay photography. A DSLR or mirrorless camera gives you the most flexibility with settings, but do not underestimate the power of a recent smartphone. The cameras on the latest iPhones and Samsung Galaxy devices produce images with more than enough resolution for ecommerce and social media. The key is shooting from directly overhead with steady hands or, ideally, a mount.
Tripod with Horizontal Arm or Overhead Mount
This is arguably the most important piece of equipment for consistent flat lay photography. A standard tripod with a reversible center column or a horizontal arm extension lets you position your camera directly above your scene without your hands getting in the frame. Dedicated overhead rigs and copy stands are also excellent choices. Some photographers even use a sturdy step ladder and shoot handheld, but a tripod setup gives you repeatable framing and eliminates camera shake.
Lighting
Good lighting is the foundation of every great photograph. For flat lays, you have two primary options: natural light from a large window, or artificial light from a softbox or LED panel. We will cover lighting techniques in detail in a later section, but at a minimum, you need a consistent, even light source that does not create harsh shadows across your arrangement.
Backgrounds
The surface your items rest on plays a huge role in the overall aesthetic of your flat lay. Popular background options include:
- Marble or stone slabs: Clean, premium, and elegant. Perfect for luxury fashion and accessories.
- Natural wood: Warm, organic, and approachable. Works beautifully for casual and outdoor brands.
- Fabric or linen: Textured and lifestyle-oriented. Adds a cozy, editorial feel to your compositions.
- Paper seamless: Available in every color, paper rolls offer a simple and affordable way to create clean, uniform backgrounds. White and light gray are the most versatile for ecommerce.
- Vinyl or PVC boards: Durable, easy to clean, and available in a variety of textures and colors. A practical choice for high-volume product photography.
Composition Techniques
Composition is where flat lay photography becomes an art form. How you arrange your clothing and props within the frame determines whether the image feels polished and intentional or random and cluttered. Here are four proven composition approaches that work exceptionally well for clothing flat lays.
The Grid Layout
The grid layout is the most structured and commercially oriented composition style. Items are arranged in neat, evenly spaced rows and columns with consistent margins between each element. Think of it as organizing your products on an invisible grid. This approach works beautifully for ecommerce product catalogs, lookbooks, and any situation where clarity and professionalism are the priority. Each item gets its own defined space, making it easy for the viewer to focus on individual products. The grid layout is also excellent for creating consistent imagery across an entire collection, as the uniform spacing creates visual harmony when images are displayed side by side in a product gallery.
The Knolling Style
Knolling is a specific arrangement technique where every object is placed at right angles to each other, creating a satisfying geometric pattern. The term was coined by sculptor Tom Sachs and has since become one of the most recognizable flat lay styles on social media. In knolling, all items are parallel or perpendicular to the edges of the frame. Pens align with notebooks, sunglasses sit parallel to wallets, and clothing is folded into precise rectangles. This obsessive organization creates a deeply satisfying visual effect that performs exceptionally well on Instagram and Pinterest. For clothing, knolling works best when you combine a folded garment with accessories like watches, belts, shoes, and everyday carry items arranged in tight, purposeful formations.
The Lifestyle Arrangement
The lifestyle arrangement takes a more relaxed, editorial approach to flat lay photography. Instead of rigid geometry, items are placed in a way that suggests a real-life context or narrative. A summer dress might be casually arranged alongside a straw hat, sunscreen, a paperback novel, and a pair of sandals, as though someone is packing for a beach vacation. This style invites the viewer to imagine themselves wearing the clothing and living the lifestyle your brand represents. It is particularly effective for social media marketing, blog posts, and email campaigns where emotional connection matters more than strict product presentation. The key to a successful lifestyle flat lay is intentional imperfection. Items should appear naturally placed, but every element is actually positioned with great care.
The Hero Shot
The hero shot composition places one main product at the center of attention, surrounded by supporting props and accessories that complement without competing. This technique is ideal when you want to spotlight a single garment, like a new arrival or a bestselling item. The hero piece occupies the most visual space and sits at or near the center of the frame, while smaller items like jewelry, flowers, a cup of coffee, or a branded tag are strategically placed around it to add context and visual interest. The supporting elements should guide the viewer's eye toward the hero item rather than distract from it. Use the rule of thirds or center framing to anchor the main piece, and give it plenty of breathing room through deliberate negative space.
Styling Tips for Clothing Flat Lays
Styling is what separates amateur flat lay photography from professional-grade imagery. The way you fold, position, and accessorize your clothing items has an enormous impact on how polished and appealing the final photograph looks. Here are the essential flat lay tips for styling clothing that photographs beautifully.
Folding Techniques That Look Natural
How you fold a garment for a flat lay is fundamentally different from how you fold it for storage. The goal is to show the garment's shape, details, and character while keeping the composition clean. For t-shirts and tops, a simple half-fold or slight tuck that reveals the neckline and one sleeve looks natural and inviting. For jeans and trousers, fold them lengthwise and add a slight bend at the knee to suggest the shape of a human leg. Sweaters and knitwear can be folded loosely to preserve their soft, textured appearance. The key rule is to avoid sharp, retail-style creases. Flat lays should look styled, not like a store shelf display.
Creating Movement
Static, perfectly symmetrical flat lays can sometimes feel stiff and lifeless. Adding subtle movement to your arrangement makes the image more dynamic and visually engaging. Try extending one sleeve of a jacket outward as if reaching for something, or let a scarf trail off to one side. You can drape a section of fabric so it flows naturally, or unbutton a shirt to reveal a hint of a layered t-shirt underneath. These small touches of implied movement make the clothing look like it belongs on a person rather than sitting flat on a table.
Accessory Placement and Prop Selection
Props and accessories add storytelling depth to your flat lays, but the rule is always less is more. Choose props that are relevant to the garment and the lifestyle it represents. A leather watch, a pair of sunglasses, or a coffee cup can elevate a casual menswear flat lay. Fresh flowers, a scented candle, or a jewelry tray work beautifully with women's fashion. Avoid props that overpower the clothing or make the composition feel busy. Every element in the frame should earn its place by contributing to the overall narrative without drawing attention away from the product.
Color Palette Harmony
A cohesive color palette is one of the most powerful tools in flat lay styling. Before arranging your shot, consider how the colors of your clothing, background, and props work together. Monochromatic flat lays, where everything shares a similar tone, feel sophisticated and editorial. Complementary color combinations like navy and camel or black and white create striking visual contrast. Avoid introducing too many competing colors, as this can make the composition feel chaotic. When in doubt, stick to a palette of two to three main colors plus one accent tone for visual interest.
Negative Space Usage
Negative space, the empty area around and between your subjects, is just as important as the objects themselves. Generous negative space gives the image room to breathe and directs the viewer's attention to the clothing. It also creates a clean, premium feel that communicates quality and sophistication. In ecommerce flat lays, negative space is especially valuable because it leaves room for text overlays, price tags, or promotional messaging in social media posts. As a general guideline, aim for at least 20 to 30 percent of the frame to be unoccupied background.
Lighting for Flat Lay Photography
Lighting can make or break your flat lay photography. The right lighting setup ensures accurate color representation, eliminates distracting shadows, and brings out the textures and details that make clothing look appealing. Here is how to approach lighting for flat lay photography, whether you are working with natural or artificial light.
Natural Light
Natural light from a large window is the simplest and most forgiving light source for flat lay photography. Position your flat lay surface near a north-facing window (or any window that does not receive direct sunlight) to get beautiful, soft, diffused light that wraps evenly around your products. The best times to shoot are mid-morning and mid-afternoon when the light is bright but not harsh. If the sunlight is too strong and creates hard shadows, hang a sheer white curtain or tape a sheet of diffusion paper over the window to soften it. Natural light produces wonderfully warm, true-to-life colors that are perfect for lifestyle and social media flat lays.
Artificial Light
For consistent results regardless of weather or time of day, an artificial lighting setup is essential. A single large softbox or LED panel positioned directly above your scene at a 45-degree angle provides even, controllable illumination. For flat lays, overhead lighting tends to work best because it minimizes shadows and lights the entire surface uniformly. If you are using a single light source from the side, you may need to add a reflector on the opposite side to fill in shadow areas. Choose daylight-balanced bulbs (5000K to 5500K) for accurate color reproduction that matches how your products look in real life.
Avoiding Shadows
One of the trickiest challenges in flat lay photography is avoiding shadows cast by your own hands, camera, or tripod. When shooting directly overhead, your camera and mount can block the light source and create a dark shadow in the center of the frame. To combat this, position your main light source slightly to one side rather than directly above, and use a second light or reflector on the opposite side to balance the illumination. If you are shooting handheld, step to one side of the frame and use a remote trigger or timer to take the shot. The goal is to light the scene as evenly as possible so no unwanted shadows distract from the products.
Using a Reflector
A simple white foam board or purpose-built photography reflector placed opposite your main light source can work wonders for flat lay photography. The reflector bounces light back into shadow areas, reducing contrast and ensuring that every detail of your clothing is visible. For flat lays, you can even place a reflector underneath a glass or acrylic surface to bounce light upward, adding a subtle fill that eliminates shadows under folded fabric and layered items. This technique is especially useful for darker-colored garments that tend to absorb light and lose detail in shadows.
Camera Settings and Shooting Tips
Getting your camera settings right is essential for sharp, well-exposed flat lay images. While the specifics will vary depending on your equipment and lighting conditions, these guidelines will help you achieve consistent, professional results every time you shoot.
Shoot From Directly Overhead
The defining characteristic of flat lay photography is the perfectly overhead, 90-degree camera angle. Your camera sensor should be exactly parallel to the flat surface below. Even a slight tilt will create perspective distortion, making items at the far edge of the frame appear smaller than those closest to the camera. Use a bubble level on your tripod or the built-in leveling guides in your camera's viewfinder to ensure you are perfectly straight. Most smartphones also have a crosshair leveling tool that activates when you point the camera downward.
Use a Timer or Remote Trigger
Camera shake is the enemy of sharp flat lay images, especially in lower light conditions. Rather than pressing the shutter button manually, which introduces vibration, use your camera's built-in self-timer (2-second or 10-second delay) or a wireless remote trigger. This is particularly important when shooting on a tripod with a horizontal arm, as even a gentle press can cause the entire rig to vibrate. Many cameras also support smartphone apps that let you trigger the shutter and preview the composition wirelessly, which is incredibly convenient for overhead setups where the viewfinder is out of reach.
Aperture Settings
For flat lay photography, you want everything in the frame to be uniformly sharp. Since all your items are arranged on a flat surface at roughly the same distance from the camera, you do not need an extremely narrow aperture. An aperture of f/5.6 to f/8 provides the ideal balance of sharpness and light gathering. Going much wider (like f/2.8) can introduce a shallow depth of field that blurs items at the edges, while stopping down to f/16 or beyond can actually reduce sharpness due to diffraction. For most flat lay setups, f/7.1 is a sweet spot that delivers edge-to-edge clarity.
Keep ISO Low
Digital noise is most visible in smooth, uniform areas like fabric surfaces and paper backgrounds. To keep your flat lay images clean and noise-free, set your ISO as low as possible, ideally between 100 and 400. With adequate lighting, whether natural or artificial, you should have no trouble keeping ISO at its base value. If you find yourself needing a higher ISO to get a proper exposure, that is a signal to add more light to the scene rather than bumping up the ISO. Remember that sharp, clean images project quality and professionalism, and excessive noise undermines that perception.
White Balance
Accurate white balance ensures that the colors in your flat lay photograph match the actual colors of your products. Incorrect white balance can make whites appear yellowish or bluish, which creates customer confusion and increases return rates. Set your white balance manually using a gray card, or shoot in RAW format so you can fine-tune the color temperature in post-processing. If you are using natural light, the daylight or cloudy preset usually works well. For artificial lighting, match your white balance to the color temperature of your bulbs.
Editing and Post-Processing Flat Lays
Even the most carefully shot flat lay photographs benefit from some post-processing to bring them to their full potential. Editing is where you polish your images, correct minor issues, and ensure visual consistency across your entire product catalog. Here are the essential editing steps for flat lay photography.
Correcting Perspective Distortion
Despite your best efforts to shoot from a perfectly level position, some perspective distortion often creeps in. Items at the edges of the frame may appear slightly skewed or stretched, particularly when shooting with a wide-angle lens. Most photo editing software, including Adobe Lightroom, Photoshop, and Capture One, includes lens correction and transform tools that can straighten your flat lay with just a few clicks. Use the guided transform feature to align straight edges in your composition, and enable lens profile corrections to remove barrel distortion automatically.
Color Consistency Across Product Shots
When you are photographing an entire clothing collection, maintaining consistent color representation from shot to shot is critical. Customers expect the navy blue in your flat lay to match the navy blue on the product page and in real life. Create a preset or profile for your flat lay setup that standardizes white balance, exposure, contrast, and saturation. Apply this preset to every image in the series, then make minor adjustments as needed. Shooting with a color checker card in your first frame gives you a reference point to calibrate all subsequent images precisely.
Background Cleanup
No matter how carefully you prepare your background, you will often find small imperfections when you zoom in: dust particles, fabric wrinkles, surface scratches, or stray threads from your clothing. The clone stamp and healing brush tools in Photoshop or similar editors make quick work of these blemishes. For white or solid-color backgrounds, you can also use curves or levels adjustments to push the background to a perfectly uniform tone. This cleanup step is especially important for ecommerce listings where a clean, professional presentation directly impacts customer trust and purchase decisions.
From Flat Lay to Ghost Mannequin
While flat lay photography excels at creating beautiful, styled compositions, many ecommerce platforms and customers also expect to see how clothing looks in a three-dimensional, worn context. This is where the ghost mannequin effect becomes invaluable. Traditionally, creating ghost mannequin images required photographing garments on a physical mannequin and then painstakingly editing out the mannequin in post-production, a time-consuming and technically demanding process.
PixFocal AI can transform your flat lay photos into professional 3D ghost mannequin images automatically. Instead of reshooting your entire catalog on a mannequin, simply upload your flat lay photographs and let PixFocal's AI generate realistic ghost mannequin versions that show the garment's shape, fit, and drape as if worn by an invisible model. This workflow saves hours of photography and editing time while giving you both flat lay and ghost mannequin images from a single photo session.
Flat Lay to Ghost Mannequin with PixFocal AI
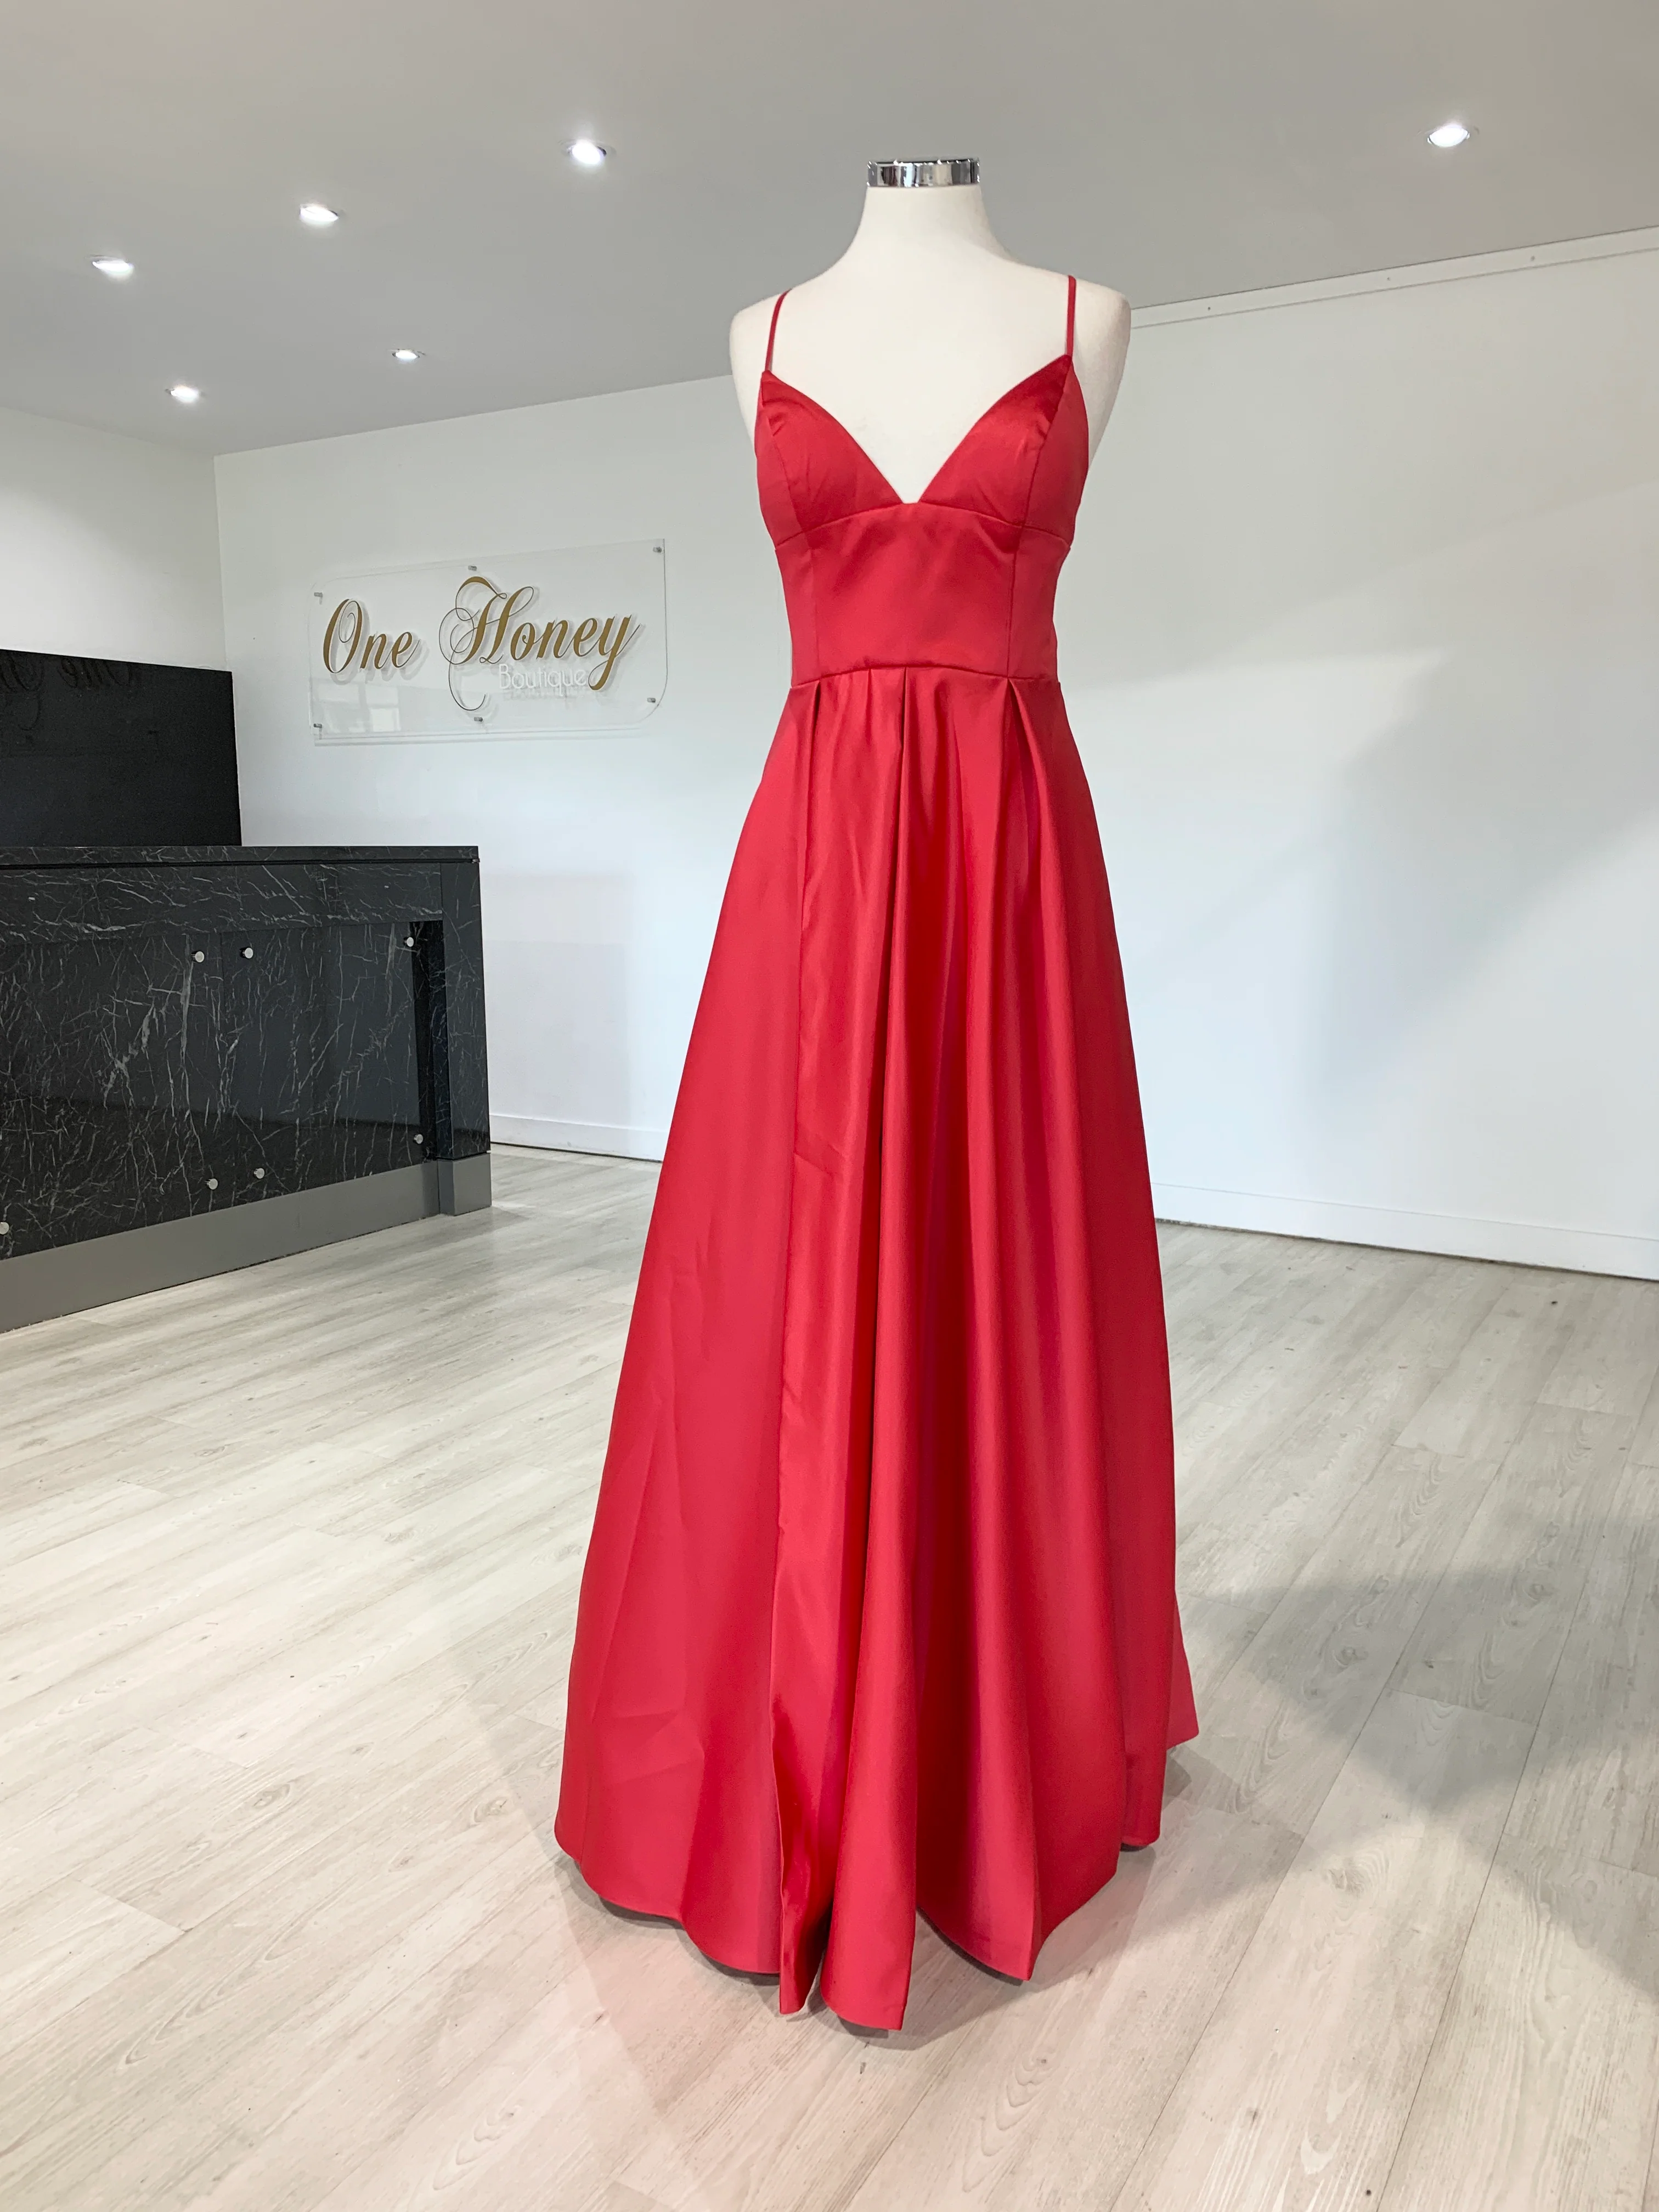
Before: Flat Lay Photo
After: Ghost Mannequin by PixFocal
Flat Lay vs Ghost Mannequin: Which Should You Use?
Both flat lay photography and ghost mannequin photography serve important roles in a clothing brand's visual strategy. Understanding when to use each technique, and how to combine them, will help you create the most effective product listings possible.
| Feature | Flat Lay Photography | Ghost Mannequin Photography |
|---|---|---|
| Perspective | Overhead, 2D view | Front-facing, 3D appearance |
| Shows Fit & Shape | Limited | Excellent |
| Lifestyle Appeal | High (with props and styling) | Low (product-focused) |
| Best For | Social media, casual wear, accessories | Ecommerce listings, structured garments |
| Equipment Needed | Minimal (camera, tripod, surface) | Mannequin, studio, or PixFocal AI |
| Editing Complexity | Low to moderate | High (or instant with PixFocal) |
| Customer Confidence | Good for detail views | Higher for purchase decisions |
When Flat Lay Works Better
Flat lay photography is the stronger choice when you want to create lifestyle-oriented content, build brand atmosphere on social media, or showcase accessories and smaller items alongside clothing. It excels at telling a visual story, grouping coordinating pieces together for outfit inspiration, and producing content for Instagram, Pinterest, email campaigns, and blog posts. Flat lays are also faster to produce in volume, making them ideal for brands that need to create a high volume of social content on a regular schedule. For casual clothing categories like t-shirts, loungewear, activewear, and swimwear, flat lays can serve as primary product images alongside more traditional shots.
When Ghost Mannequin Is Preferred
Ghost mannequin photography is typically preferred for primary ecommerce product listings, especially on platforms like Amazon, Shopify, and other online marketplaces where customers expect to see how a garment looks when worn. The three-dimensional, body-shaped presentation gives shoppers a much clearer understanding of fit, silhouette, and drape. For structured garments such as blazers, coats, dress shirts, and tailored dresses, ghost mannequin images are almost essential because these items do not translate well to a flat surface. Ghost mannequin photos also tend to convert better in product pages because they help customers visualize wearing the item themselves.
Using Both for Comprehensive Product Listings
The most successful clothing brands do not choose one technique over the other. They use both. A comprehensive product listing might include a ghost mannequin hero image showing the garment's shape and fit, followed by flat lay images that display the item alongside coordinating accessories and lifestyle context. This combination gives customers the practical product information they need to make a purchase decision along with the aspirational lifestyle imagery that builds brand desire and emotional connection. With PixFocal, you can efficiently produce both formats from the same flat lay photo session, maximizing your content output while minimizing photography costs.
Flat Lay Photography Mistakes to Avoid
Even experienced photographers fall into common flat lay traps. Being aware of these mistakes will help you avoid them and produce consistently strong images from your very first shoot.
Cluttered Compositions
The most frequent flat lay mistake is trying to include too many items in a single frame. When every square inch of the surface is covered with products and props, the viewer's eye has nowhere to rest and no clear focal point. The result feels overwhelming rather than inspiring. Remember that negative space is your friend. Start with fewer items than you think you need, and only add elements that genuinely contribute to the composition. A clean, focused flat lay with five thoughtfully placed items will always outperform a crowded arrangement with fifteen competing objects.
Inconsistent Styling
If you are photographing multiple products for a collection or product catalog, consistency is paramount. Inconsistent styling, where folding techniques, prop selections, background colors, or spacing vary randomly between shots, creates a disjointed visual experience that undermines your brand's professionalism. Before you start shooting, establish a style guide that defines your flat lay standards: which background to use, how to fold each garment type, which props to include, and how much negative space to leave. Apply these standards consistently across every image in the series.
Bad Shadows
Unintentional shadows are one of the quickest ways to make a flat lay look amateur. Shadows from your camera, tripod arm, or even your own body falling across the arrangement create dark patches that distort colors, hide details, and make the image look like it was shot carelessly. Always check your lighting before you start arranging products. Move your light sources around, add reflectors where needed, and take test shots specifically to check for shadow issues. A few minutes of lighting refinement before the shoot saves hours of tedious shadow removal in post-processing.
Wrong Camera Angle
A flat lay that is not shot from a true 90-degree overhead angle is not really a flat lay. Even a 5- to 10-degree deviation creates noticeable perspective distortion that makes items at the far edge of the frame look different from those at the near edge. This inconsistency is particularly obvious with rectangular objects like folded clothing, books, and phone cases. Always use a level to confirm your camera is perfectly parallel to the surface. If you are shooting handheld, activate your camera or smartphone's leveling grid and take extra care to keep it centered.
Ignoring the Background
A wrinkled sheet, a scuffed tabletop, or a background with distracting patterns can ruin an otherwise excellent flat lay composition. The background should complement your products, not compete with them. Before shooting, inspect your surface carefully for imperfections, lint, dust, or creases. Iron fabric backgrounds, wipe down hard surfaces, and use lint rollers on any textile material. What seems invisible to the naked eye often becomes glaringly obvious in a high-resolution photograph.
Start Creating Professional Flat Lay Photography Today
Flat lay photography is one of the most accessible, versatile, and effective product photography techniques available to clothing brands of any size. With minimal equipment, a thoughtful approach to composition and styling, and attention to lighting fundamentals, you can create stunning overhead images that showcase your products beautifully, engage your audience on social media, and drive sales across your ecommerce channels.
The key takeaways from this guide are straightforward. Invest in a stable overhead shooting setup. Choose backgrounds that complement your brand aesthetic. Master a few core composition techniques and apply them consistently. Pay close attention to lighting and shadows. Keep your camera settings optimized for sharpness and clean exposure. And always spend time on post-processing to ensure your images are polished and color-consistent.
But remember that flat lay photography does not have to be an either-or choice. The most effective product listings combine flat lay images with ghost mannequin views that show how clothing fits and drapes on a body. With PixFocal's AI-powered ghost mannequin tool, you can transform your flat lay photos into professional 3D ghost mannequin images in minutes, no physical mannequin or complex editing required. Upload your flat lay, and let PixFocal handle the rest.