Ghost Mannequin Photography: The Complete Guide for Clothing Brands
If you sell clothing online, the quality of your product images directly impacts your conversion rates. Shoppers cannot touch or try on your garments, so they rely entirely on photographs to make purchasing decisions. That is where ghost mannequin photography comes in.
The ghost mannequin effect -- sometimes called the invisible mannequin or hollow man effect -- creates the illusion of clothing being worn by an invisible person. The garment appears to float in space with a natural three-dimensional shape, free from any distracting mannequin, model, or hanger. This technique has become the gold standard for ecommerce clothing photography, used by virtually every major online retailer to present their products in a clean, professional, and consistent manner.
In this comprehensive guide, you will learn exactly how ghost mannequin photography works, the traditional step-by-step process, modern AI-powered alternatives, and best practices for different garment types. Whether you are launching a new clothing brand or optimizing an existing product catalog, this guide covers everything you need to know.
Ghost Mannequin Effect: Before & After
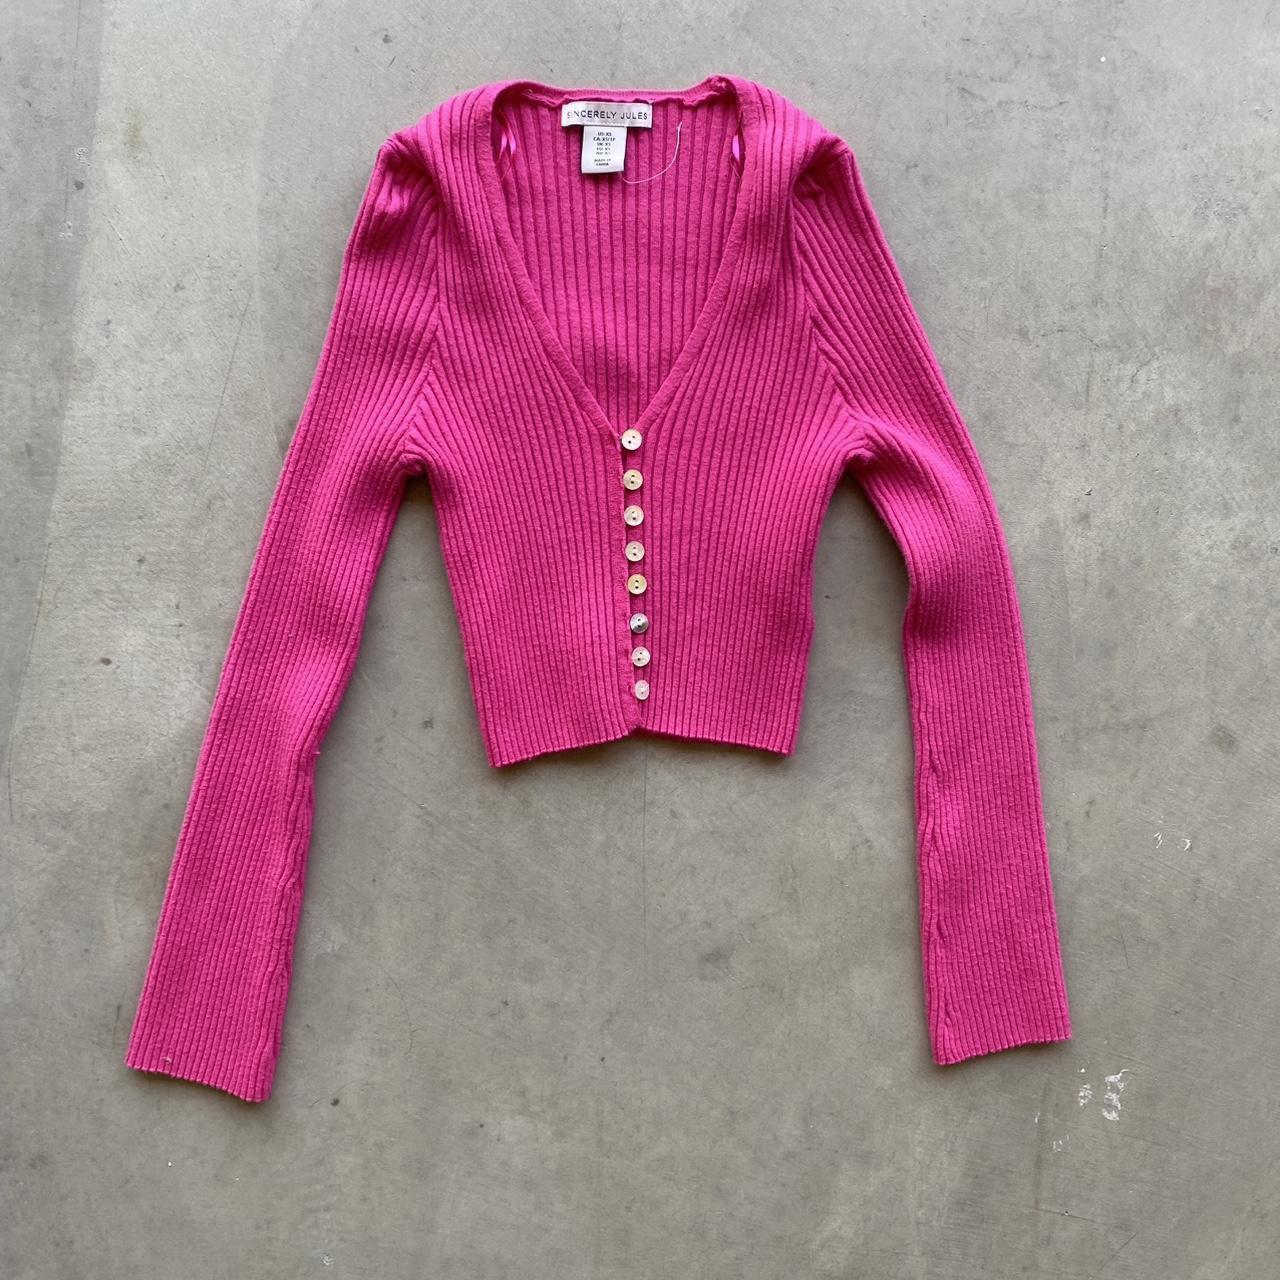
Before: Clothing on mannequin
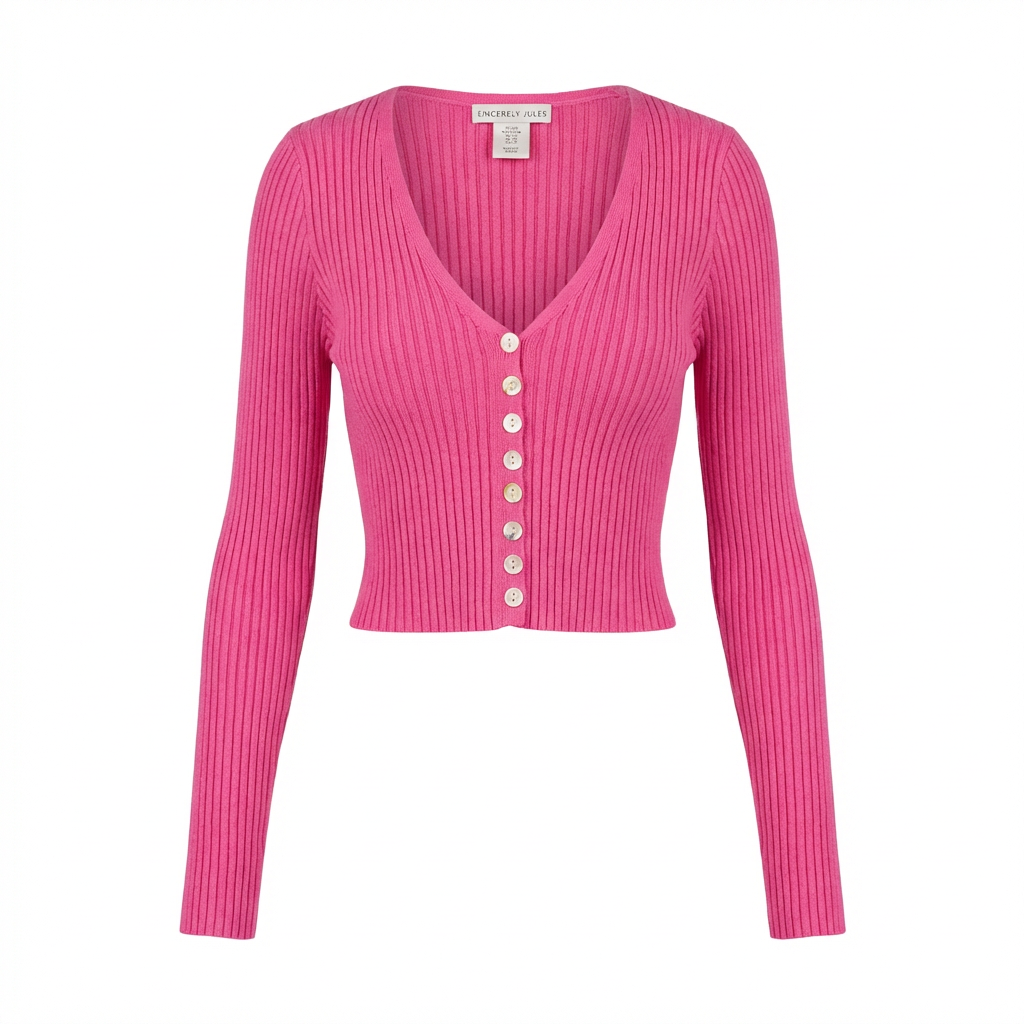
After: Ghost mannequin effect applied
What Is Ghost Mannequin Photography?
Ghost mannequin photography is a product photography and post-production technique that removes the mannequin from clothing images while preserving the garment's three-dimensional shape. The final result shows the clothing as if it were being worn by an invisible person -- hence the name "ghost" mannequin.
The technique works by photographing a garment on a mannequin from multiple angles, then compositing those images together in post-production. The mannequin is removed, and the interior details of the garment (such as the inside of the collar, the inner neckline, or the interior lining) are revealed to create depth and dimension.
Why Clothing Brands Need Ghost Mannequin Photography
There are several compelling reasons why the ghost mannequin effect has become the industry standard for clothing product photography:
- Shows garment shape and fit. Unlike flat lay photography, the ghost mannequin effect displays how the clothing actually looks when worn, giving customers a realistic sense of the garment's silhouette and drape.
- Removes distractions. Models add personality but can also distract from the product itself. Ghost mannequin images keep the focus entirely on the clothing, its construction, and its details.
- Creates visual consistency. When every product in your catalog is photographed with the same ghost mannequin technique, the result is a clean, uniform shopping experience that looks professional and trustworthy.
- Cost-effective at scale. Hiring models for every garment in a large catalog is expensive. Ghost mannequin photography eliminates model fees and scheduling logistics while producing consistently high-quality images.
- Marketplace requirements. Many ecommerce platforms prefer or require clean product-only images for primary listing photos.
Major retailers like ASOS, Zara, H&M, Nordstrom, and thousands of independent Shopify stores rely on ghost mannequin photography for their product catalogs. It is a proven technique that helps customers make informed purchasing decisions and reduces return rates by setting accurate expectations.
Traditional Ghost Mannequin Photography: Step by Step
The traditional approach to ghost mannequin photography involves a multi-step process of shooting, then editing in Adobe Photoshop. While it requires skill and patience, understanding this process gives you a solid foundation for producing professional clothing images.
Equipment Needed
Before you start shooting, gather the following equipment:
- Camera: A DSLR or mirrorless camera with manual settings. Entry-level models like the Canon EOS Rebel T8i or Nikon D5600 work well. A smartphone with a good camera can also work for smaller operations.
- Tripod: Essential for keeping your camera position consistent between shots. Any sturdy tripod will do -- consistency is what matters.
- Lighting: Two to three continuous lights or strobes with softboxes or umbrellas. Even, diffused lighting eliminates harsh shadows and accurately represents fabric colors.
- Mannequin: A full-body mannequin or bust form in a neutral color (white or light gray). Some photographers use specialized mannequins with removable parts (arms, torso sections) that make editing easier.
- Pins, clips, and tape: Fashion styling clips, binder clips, straight pins, and double-sided tape to adjust the fit of garments on the mannequin.
- White or neutral background: A seamless paper roll or fabric backdrop. White is the most common for ecommerce.
- Steamer: A handheld garment steamer to remove wrinkles before shooting.
Shooting the Front View
The front view is your primary shot and the one customers will see first in your product listing.
- Prepare the garment. Steam the garment thoroughly to remove all wrinkles and creases. Pay special attention to collars, cuffs, and hems.
- Dress the mannequin. Put the garment on the mannequin and use pins and clips on the back to create a snug, flattering fit. Tuck excess fabric behind the mannequin so the front looks clean and tailored.
- Position the camera. Set your camera on the tripod at the center height of the garment. For tops, this typically means chest height. For full outfits, position the camera at waist height. Maintain a consistent distance -- typically 4 to 6 feet from the mannequin.
- Set up lighting. Place your main light (key light) at a 45-degree angle to the mannequin, slightly above. Add a fill light on the opposite side to reduce shadows. If using a third light, position it behind and above for subtle rim lighting that separates the garment from the background.
- Camera settings. Shoot in manual mode with a low ISO (100-200), an aperture of f/8 to f/11 for maximum sharpness, and adjust shutter speed for proper exposure. Shoot in RAW format for maximum editing flexibility.
- Take the shot. Use a remote shutter release or the camera's timer to avoid camera shake. Take multiple shots and review on your camera's screen for sharpness and proper exposure.
Shooting the Back and Interior View
This step is what makes the ghost mannequin effect possible. You need to capture the interior of the garment to fill in the areas where the mannequin will be removed.
- Remove the garment carefully. Take the garment off the mannequin without disturbing your camera or lighting setup.
- Flip and position the garment. Turn the garment inside out or fold it to reveal the interior neckline, collar, and any inside construction details. Place it on a flat surface or back on the mannequin turned around.
- Match the angle exactly. This is critical. The interior shot must align with the front shot so the two can be seamlessly composited. Do not move your camera or change your zoom. The only thing that changes is the garment's position.
- Photograph the interior details. Focus on capturing the inside of the collar, the neckline, interior label area, and any areas that will be visible once the mannequin is digitally removed.
- For back views: If you want a separate back view for your listing, turn the mannequin around (or dress it with the back facing the camera) and repeat the front-shooting process.
Photoshop Compositing
This is where the "ghost" effect is created. Adobe Photoshop is the industry-standard tool for this step.
- Open both images. Load your front mannequin shot and your interior/back shot as separate layers in the same Photoshop document.
- Remove the mannequin. Using the Pen Tool or Quick Selection Tool, carefully outline the garment on the front shot. Create a layer mask to hide the mannequin, leaving only the clothing visible.
- Position the interior shot. Place the interior shot layer behind the front layer. Align it so the inside collar and neckline details appear naturally in the gap left by the removed mannequin.
- Refine the mask. Zoom in to 200-300% and carefully refine the edges of your layer mask. Use a soft brush to blend the transition between the front and interior layers. Pay close attention to the neckline, armholes, and hem areas.
- Clean up and retouch. Remove any visible pins, clips, or tape. Adjust color consistency between the two layers. Use the Clone Stamp and Healing Brush tools to fix any imperfections.
- Add a shadow. Create a subtle drop shadow beneath the garment to ground it and add dimension. A soft, light gray shadow works best.
- Export. Save your final image as a high-quality JPEG (for web) or PNG (if transparent background is needed).
The traditional Photoshop compositing process typically takes 15 to 30 minutes per garment for an experienced editor. For someone new to the technique, expect to spend 45 minutes to an hour per image. When you have hundreds of products in your catalog, this time adds up quickly.
AI Ghost Mannequin Photography: The Modern Approach
Artificial intelligence has fundamentally changed how clothing brands create ghost mannequin images. What once required hours of skilled Photoshop work can now be accomplished in minutes with AI-powered tools.
How AI Has Revolutionized the Process
Modern AI ghost mannequin tools use advanced computer vision and generative models to understand garment structure, identify the clothing versus the mannequin or model, and intelligently reconstruct the interior details. The technology has matured significantly, producing results that are often indistinguishable from traditional hand-edited images.
How It Works
With an AI ghost mannequin service, the workflow is dramatically simplified:
- Upload any photo. You can start with a photo of clothing on a mannequin, on a model, or even a flat lay image. The AI handles all input types.
- AI processes the image. The AI identifies the garment, separates it from the background and mannequin/model, and generates the 3D ghost mannequin effect -- including interior details.
- Download your result. In about two minutes, you receive a professional ghost mannequin image ready for your product listing.
AI-Powered Ghost Mannequin: Before & After
Before: Original photo
After: AI ghost mannequin result
Speed and Cost Comparison
The advantages of AI ghost mannequin photography are substantial when compared to the traditional method:
| Factor | Traditional Method | AI-Powered Method |
|---|---|---|
| Time per image | 15-30 minutes | ~2 minutes |
| Cost per image | $15-50 | $1-3 |
| Skill required | Advanced Photoshop | None (upload and download) |
| Photos needed | 2+ per garment (front + interior) | 1 photo per garment |
| Input flexibility | Mannequin shots only | Mannequin, model, or flat lay |
| Batch processing | One at a time | Multiple images simultaneously |
| Consistency | Varies by editor skill | Consistently uniform output |
How PixFocal's AI Ghost Mannequin Service Works
PixFocal's AI ghost mannequin tool is designed specifically for clothing brands that need professional ghost mannequin images at scale. The process is straightforward:
- Upload your image. Drag and drop any clothing photo -- whether it is on a model, mannequin, hanger, or flat surface.
- AI creates the ghost mannequin effect. PixFocal's AI analyzes the garment's shape, fabric, and construction, then generates a clean ghost mannequin image with realistic interior details and natural shadows.
- Download and use. Your finished image is ready for your Shopify store, Amazon listing, or any other ecommerce platform.
For brands processing large catalogs, this means turning hundreds of product photos into ghost mannequin images in hours instead of weeks -- at a fraction of the traditional cost.
Ghost Mannequin Photography Tips
Whether you choose the traditional method or an AI-powered approach, these tips will help you get the best possible results from your ghost mannequin photography:
- Use consistent lighting across all products. Set up your lights once and do not change them between garments. Consistent lighting means consistent colors and shadows, which creates a professional, cohesive catalog.
- Keep camera settings identical for batch consistency. Lock in your aperture, shutter speed, ISO, and white balance settings. Shoot in manual mode so your camera does not adjust between shots.
- Pin garments to show their best shape. Use pins and clips on the back of the mannequin to eliminate excess fabric and create a flattering silhouette. The goal is to show the garment at its best without distorting its actual fit.
- Steam everything before shooting. Wrinkles are the number one quality killer in clothing photography. A handheld steamer takes minutes to use and makes an enormous difference in the final image quality.
- Shoot both front and back views. Customers want to see the garment from multiple angles. A front and back ghost mannequin image pair gives them a complete picture of the product.
- Use a consistent mannequin size. If you switch mannequin sizes between products, the proportions of your images will vary, making your catalog look inconsistent.
- Maintain a consistent crop and framing. Leave the same amount of space around each garment. This uniformity looks professional and is particularly important when images appear in a product grid on your website.
- Shoot at the highest resolution possible. High-resolution images allow customers to zoom in on fabric details and construction, which increases confidence in the product and reduces returns.
Best Practices for Different Garment Types
Different types of clothing present unique challenges for ghost mannequin photography. Here are specific tips for the most common garment categories:
T-Shirts and Tops
T-shirts and casual tops are the most common items photographed with the ghost mannequin technique and generally the easiest to work with.
- Use a bust-form mannequin for tops -- you do not need a full-body mannequin.
- Pay attention to the collar and neckline, as these areas are where the ghost mannequin effect is most visible and important.
- For v-neck tops, make sure the interior shot captures enough of the inner neckline to create a convincing depth effect.
- Smooth out the sleeves and ensure they hang naturally. Use pins on the back if sleeves need adjustment.
- For graphic tees, ensure the design is perfectly centered and the print is fully visible without wrinkles distorting the artwork.
Dresses and Skirts
Dresses and skirts benefit greatly from the ghost mannequin effect because it shows how they drape and flow.
- Use a full-body mannequin for dresses to show the complete silhouette from neckline to hem.
- For A-line or flared skirts, consider using a bit of fishing line or clear thread to give the hem a natural, slightly flared appearance.
- Ensure the waistline sits correctly on the mannequin. If the garment is too loose, pin the excess at the back.
- For longer dresses and skirts, you may need to lower your camera position to capture the full length without distortion.
- Pay attention to the hemline -- it should be even and natural-looking in the final image.
Jackets and Outerwear
Jackets and outerwear are where ghost mannequin photography truly shines, as these structured garments look their best when displayed with three-dimensional form.
- Show the jacket both open and zipped/buttoned to give customers multiple views.
- Stuff the sleeves lightly with tissue paper if they look flat or collapsed.
- For jackets with collars, the interior shot is especially important to show the collar standing naturally.
- If the jacket has a hood, decide whether to show it up or down, and be consistent across your product range.
- Zip closures, buttons, and hardware should be polished and clearly visible.
Pants and Jeans
Pants require a slightly different approach since the waistband interior is the key area for the ghost mannequin effect.
- Use a lower-body mannequin or a full-body mannequin for trousers.
- The interior shot should focus on the waistband, showing the inside of the waist and any interior branding or construction details.
- Pin the waist at the back to create a clean, fitted front view.
- Ensure the leg opening and hem look natural. Cuffs should be even and properly aligned.
- For jeans, show off details like stitching, rivets, and pocket construction, as these are selling points.
Ghost Mannequin vs Other Product Photography Methods
Ghost mannequin photography is not the only way to photograph clothing for ecommerce. Understanding the strengths and weaknesses of each method helps you choose the right approach for your brand and budget.
| Method | Pros | Cons | Best For |
|---|---|---|---|
| Ghost Mannequin | 3D shape, clean look, consistent, scalable | Requires post-production (traditional) or AI tool | Primary product images, large catalogs |
| Flat Lay | Easy to shoot, no mannequin needed, creative styling | No 3D shape, harder to show fit and drape | Social media, lifestyle content, accessories |
| On-Model | Shows real fit, lifestyle appeal, emotional connection | Expensive, time-consuming, model can distract from product | Hero images, lifestyle galleries, lookbooks |
| Hanger | Fast to shoot, minimal editing, low cost | Looks cheap, no shape, hanger visible | Quick listings, temporary or clearance items |
When to Use Each Method
Most successful clothing brands use a combination of these methods. A common approach is:
- Ghost mannequin images as the primary product photo and for secondary views (front, back, detail shots).
- On-model images as secondary photos to show fit and styling on a real person.
- Flat lay images for social media, email marketing, and creative content.
The ghost mannequin image typically serves as the main or hero image in product listings because it offers the clearest view of the garment itself. On-model and flat lay images then supplement the listing with lifestyle context and styling inspiration.
Frequently Asked Questions
What is the ghost mannequin effect?
The ghost mannequin effect (also called the invisible mannequin or hollow man effect) is a photography and post-production technique that creates the illusion of clothing being worn by an invisible person. The garment appears to have a 3D shape and form without any visible mannequin, model, or hanger, giving customers a clear view of the product's fit and construction.
How much does ghost mannequin photography cost?
Traditional ghost mannequin photography typically costs $15 to $50 per image when outsourced to a professional retouching service, including the Photoshop compositing work. DIY approaches require an initial equipment investment of $200 to $1,000 plus 15 to 30 minutes of editing time per garment. AI-powered solutions like PixFocal can produce ghost mannequin images for $1 to $3 per image with results in under 2 minutes.
Can AI create ghost mannequin photos?
Yes, modern AI tools can create professional ghost mannequin photos from a single input image. Services like PixFocal use advanced AI to automatically remove the mannequin, model, or background and generate the 3D hollow effect. You can upload photos of clothing on models, mannequins, or even flat lay images, and the AI will produce a clean ghost mannequin result in minutes.
What file format should I use for ghost mannequin photos?
For ecommerce use, save your ghost mannequin photos as JPEG or WebP at 72 DPI for web optimization. Use PNG if you need a transparent background. Most marketplaces like Amazon require JPEG format with white backgrounds. For archival and editing purposes, keep your original files in TIFF or PSD format at the highest resolution possible.
How many photos do I need per product?
For most clothing products, aim for at least 3 to 5 images: a front ghost mannequin view, a back ghost mannequin view, a detail close-up of fabric or construction, and optionally a flat lay or lifestyle image. Major ecommerce platforms recommend 5 to 7 images per listing for maximum conversion rates.
Start Creating Professional Ghost Mannequin Images Today
Ghost mannequin photography is one of the most effective ways to present clothing products online. It combines the three-dimensional appeal of on-model photography with the clean, distraction-free consistency that customers and marketplaces demand.
The traditional Photoshop method remains a viable option for those with editing skills and patience, but the rise of AI-powered ghost mannequin tools has made the technique accessible to brands of every size. What once required hours of skilled post-production work per image can now be accomplished in minutes at a fraction of the cost.
Whether you are photographing your first product or optimizing a catalog of thousands, investing in high-quality ghost mannequin photography will pay dividends through higher conversion rates, fewer returns, and a more professional brand image.
Ready to Try AI Ghost Mannequin Photography?
Upload any clothing photo and get a professional ghost mannequin image in under 2 minutes. No Photoshop skills required.
Try PixFocal FreeNo credit card required. Results in minutes.